Live_stream_chat_1
Tech Talk
Interactive video
Live streaming
생방송 중 채팅 기능에 대해 알아보기(1부)
Nov 5, 2019
채팅 기능을 구현하려는 경우 캐나다 토론토에 본사를 둔 Chatroll의 "Chatroll" 제품을 사용(함께 사용)할 것을 권장합니다. 이 문서에서는 Chatroll을 사용하여 라이브 스트리밍 시 채팅 기능을 구현하는 방법을 설명합니다.

유튜브와 페이스북의 라이브 스트리밍 기능에 채팅 기능이 포함되면서 브라이트코브의 제품도 유사한 기능을 구현할 수 있는지에 대한 문의를 자주 받습니다.
안타깝게도 브라이트코브의 제품에는 채팅 기능이 포함되어 있지 않습니다. 또한 2019년 11월 현재로서는 향후 채팅 기능을 구현할 계획이 없습니다.
다만, 채팅 기능을 구현하고자 하는 경우 브라이트코브는 캐나다 토론토에 본사를 둔 Chatroll사의 'Chatroll' 제품을 사용(연동)할 것을 권장합니다. Chatroll은 채팅 기능뿐만 아니라 채팅과 관련된 회원 관리 및 분석 기능을 SaaS로 제공하는 회사로, 웹사이트에 채팅 기능(Chatroll)을 위젯(iframe 태그)으로 임베딩하는 것이 가능합니다. 이번 글에서는 Chatroll을 이용하여 라이브 스트리밍 중 채팅 기능을 구현하는 방법에 대해 설명합니다.
*이 게시물은 최소 사용량과 설정 방법을 소개합니다. Chatroll 기능에 관한 문의에는 답변해드릴 수 없음을 양해해 주시기 바랍니다.
목차
- 1. 챗롤 계정 만들기](#1-챗롤)
- [2. 이벤트 만들기](#2-)
- [3. 대시보드 만들기](#3-)
- [4. 운영 확인](#4-)
## 1. Chatroll 계정 만들기
First, go to the company’s website at <a href=“https://chatroll.com/” target=“_blank” title=“here”>here</a> and click on “Sign Up Free” to create a Chatroll account.
Chatroll에서 이메일 주소, 사용자 이름, 비밀번호를 입력하면 쉽게 계정을 만들 수 있습니다(신용 등록이 필요 없으며 무료입니다).
## 2. 이벤트 만들기
계정이 성공적으로 생성되면 다음 화면으로 이동합니다.
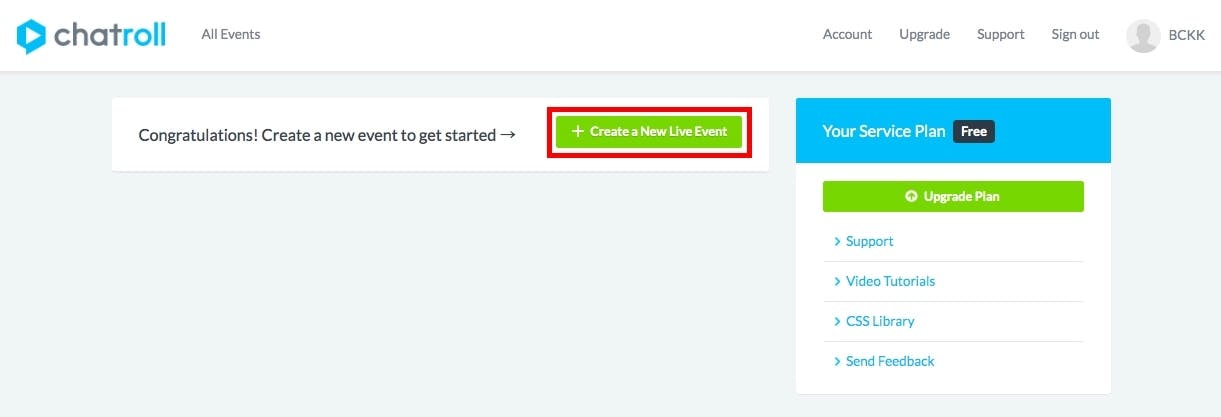
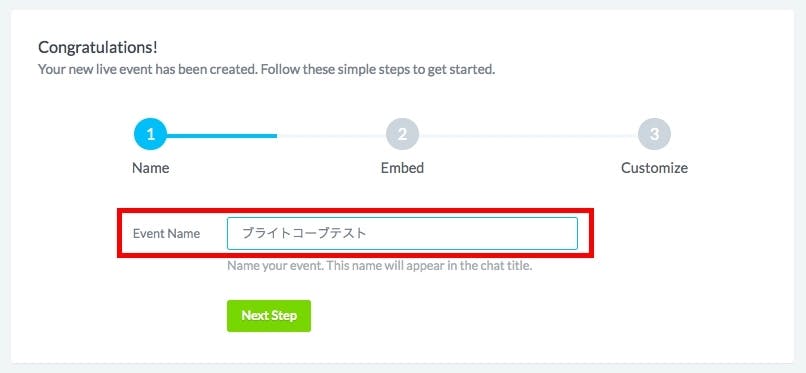
"+ 새 생방송 이벤트 만들기"를 클릭하세요. 그러면 이벤트 이름을 입력할 수 있는 다음 화면으로 이동합니다. 이 예에서는 "브라이트코브 테스트"를 입력했습니다. 이름을 입력한 후 "다음 단계"를 클릭합니다.
왼쪽 상단에 입력한 이벤트 이름이 표시된 채팅 화면과 위젯 임베딩 태그(iframe 태그)가 다음과 같이 표시됩니다.
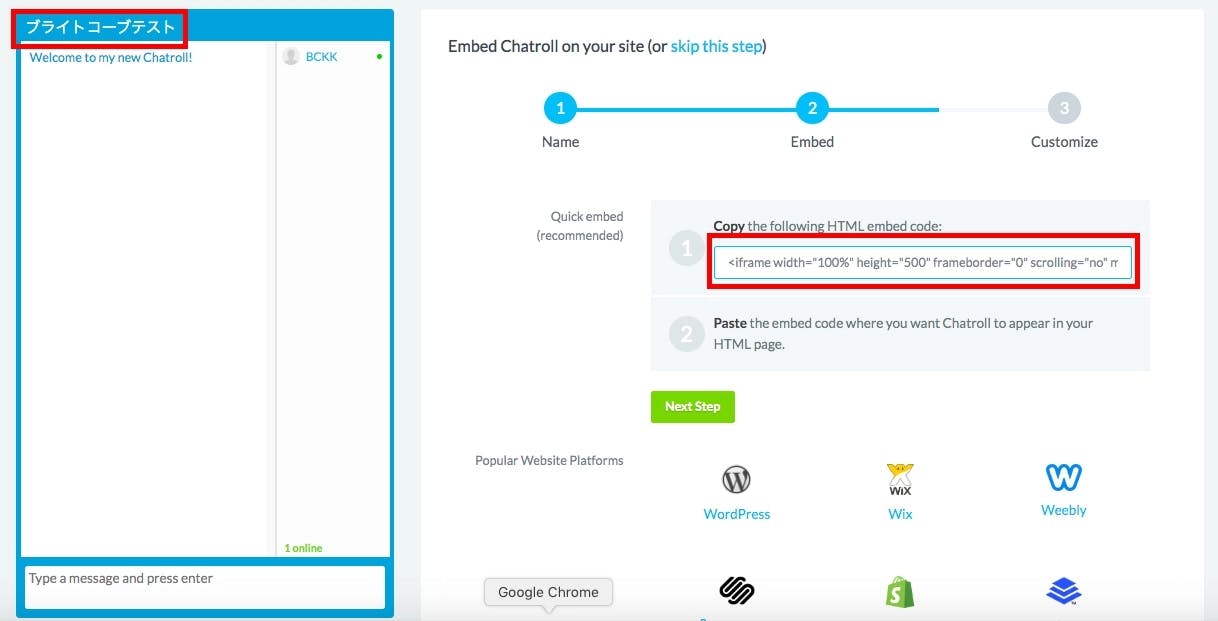
여기에서 iframe의 너비와 높이를 변경할 수도 있습니다. 설정을 완료한 후 "다음 단계"를 클릭합니다. 전환 후 "채팅 대시보드로 이동"을 클릭하여 다양한 설정을 할 수 있는 대시보드로 이동합니다.
## 3. 대시보드
이 대시보드에서는 채팅 게시물 수, 채팅에 액세스한 사용자 수 등의 분석 정보를 확인할 수 있을 뿐만 아니라 채팅 화면의 언어와 디자인을 사용자 지정하고 액세스 제한을 설정할 수 있습니다.
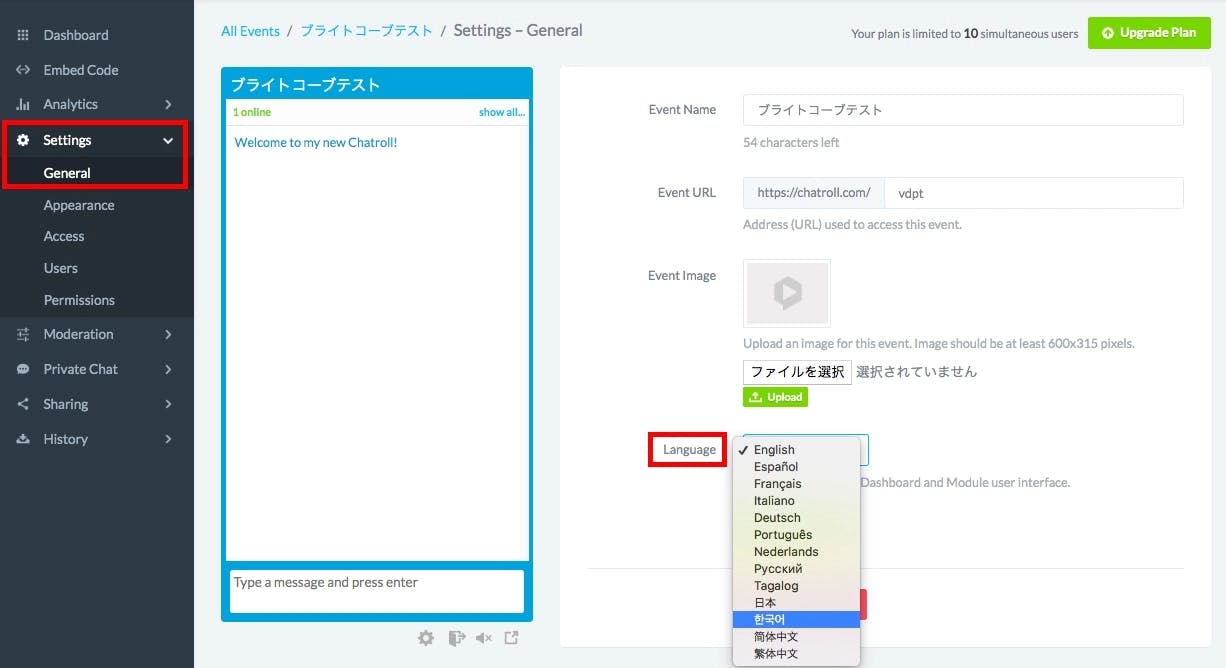
왼쪽의 '설정' 탭에서 '일반'을 클릭하세요. "언어"로 일본어를 선택할 수 있습니다. 선택 후 "설정 저장"을 클릭하세요. 이 작업을 수행하면 채팅 화면의 언어뿐만 아니라 대시보드의 언어도 변경됩니다.
위의 작업으로 "설정" 표기가 "설정"으로 변경되었을 것입니다. "모양"(영어로는 "Appearance")을 클릭하세요. 모양에서 채팅 화면의 색상을 변경하고, 소리 알림을 사용 또는 사용하지 않도록 설정하고, 메시지 순서를 변경하고, 기타 세부적인 설정을 할 수 있습니다. 이 예에서는 색상을 자홍색으로 변경하겠습니다.
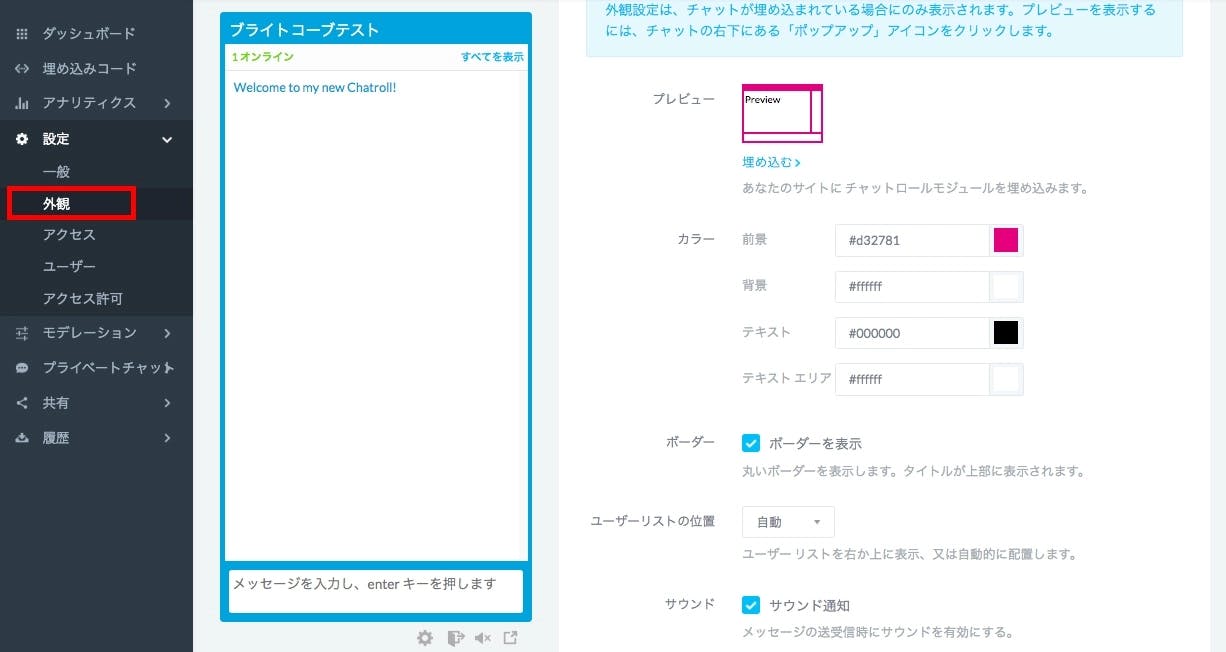
다음으로 '액세스'(영어로는 "액세스")를 소개합니다. Chatroll 무료 버전은 최대 10명의 동시 사용자를 허용합니다. 대부분의 경우 10명 이상의 사용자가 예상되므로 필요에 따라 유료 플랜으로 업그레이드하시기 바랍니다.
또한 Chatroll은 채팅에 접속할 수 있는 5가지 방법을 제공합니다: '게스트', 'Chatroll', '페이스북', '트위터', '싱글 사인온'. '페이스북'과 '트위터'는 페이스북 또는 트위터 계정을 사용하여 로그인할 수 있습니다. 'Chatroll'은 Chatroll 계정으로 로그인할 수 있는 기능이지만 2019년 11월 현재 일본에서는 사용자가 많지 않아 현실적으로 사용할 수 없으므로 이 예제에서는 체크 표시를 해제했습니다. '게스트' 기능을 사용하면 위의 계정이 없어도 로그인하지 않고도 로그인할 수 있습니다.
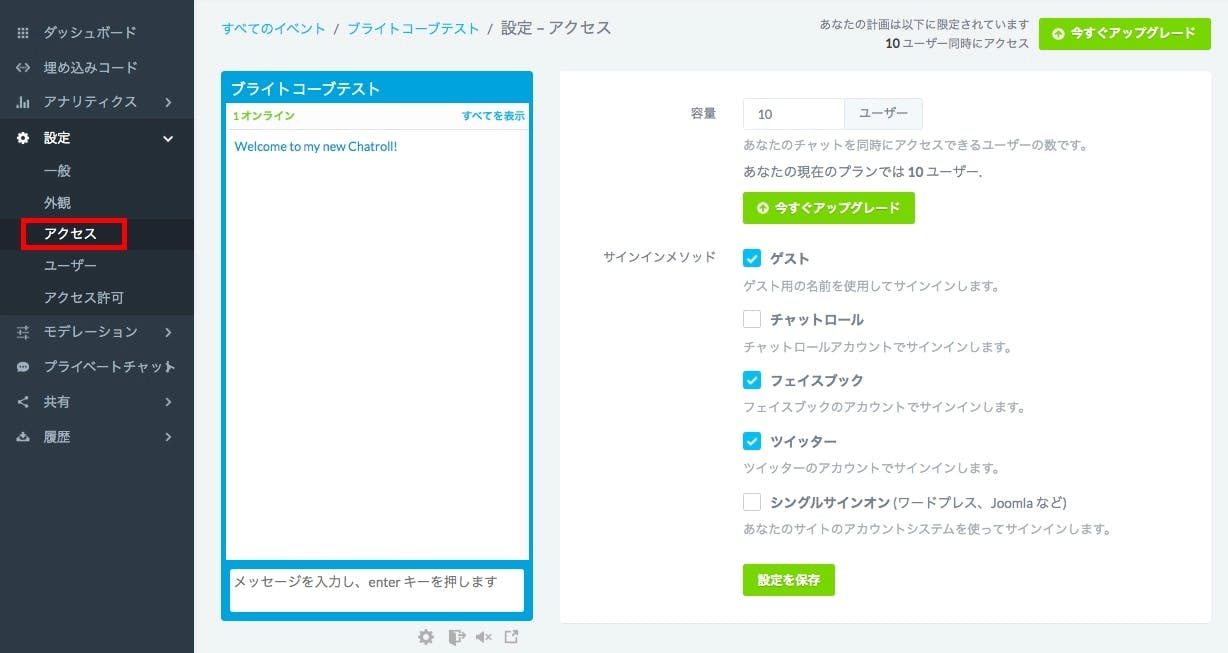
동일한 설정 탭의 '사용자'(영문: "사용자") 및 '권한'(영문: "권한") 섹션에서도 다양한 보안 설정을 할 수 있지만 이 글에서는 이에 대해서는 다루지 않습니다. 회사의 보안 정책에 따라 설정하시기 바랍니다.
마지막으로 '모더레이션'(영어로는 '중재'라고 함)에 대해 설명합니다.
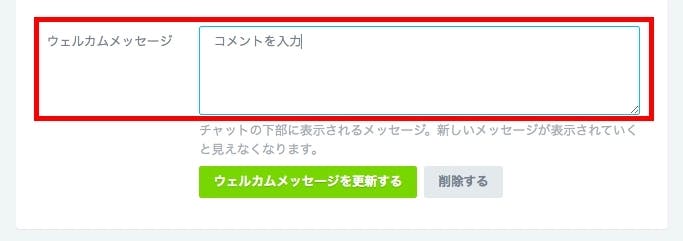
"상태 메시지" 버튼을 클릭하세요. "환영 메시지" 옆의 "새 Chatroll에 오신 것을 환영합니다!" 메시지를 원하는 메시지로 변경합니다. 이 예에서는 "댓글 입력"으로 변경했습니다. 변경한 후 "환영 메시지 업데이트" 버튼을 클릭하세요.
'수동 승인 켜기'(영어로는 '수동 승인')라는 기능도 있습니다. 이 기능을 켜면 각 게시물을 승인하고 채팅 화면에 표시할 수 있습니다.
## 4. 작동하는지 확인
이제 대부분의 설정을 완료했습니다. "코드 삽입"(영어로는 "임베드 코드")에 표시된 iframe을 웹사이트에 삽입해 보세요. 성공적으로 삽입하면 다음과 같이 표시될 것입니다.
페이스북, 트위터 및 게스트 계정으로 로그인할 수 있음을 알 수 있습니다. 이 경우 게스트 계정을 사용하여 로그인하겠습니다.

게스트 이름을 입력하고(위의 예에서는 "Brighcove Guest"를 입력했습니다) 로그인하세요. 다음과 같이 채팅에 참여할 수 있습니다.
댓글이 부적절하다고 생각되면 대시보드의 '기록' 섹션에서 해당 댓글을 삭제할 수 있습니다.
Chatroll은 [브라이트코브 갤러리](https://www.brightcove.com/ja/products/gallery "브라이트코브 갤러리")와 쉽게 결합할 수 있습니다. 후반부](https://www.brightcove.com/ja/resources/blog/live_stream_chat_2/ "후반부")에서는 브라이트코브 갤러리의 라이브 배포 템플릿과 결합하여 사용하는 방법을 소개합니다.